Don’t find yourself overwhelmed when trying to use a socket wrench.
It’s as simple as that sounds!
Yes, you’ve heard that right.
When it comes to fastening nuts and bolts, I love the advantages that a socket wrench provides over traditional wrenches. The quick ratcheting action makes it a Go-to Tool for many automotive enthusiasts and Pros. Plus, this compact tool is a lifesaver in tight spaces.
But to get the most out of this handy tool, you have to know the right way to use it.
If you’re interested to learn how to use a socket wrench, you’re in the right place. This guide will provide you with the easy steps for using your ratcheting wrench.
What is a Socket Wrench?
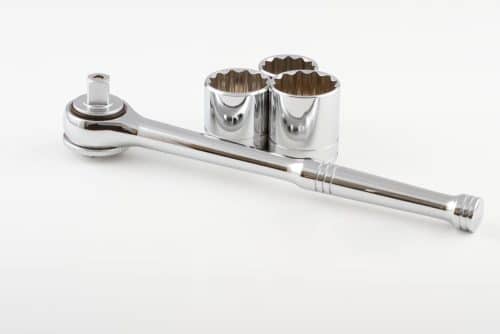
A ratchet and socket combination is called a socket wrench or ratcheting socket wrench. In British English, it’s also called socket spanner. It lets you turn a nut or bolt without repositioning the tool on the fastener.
Similar to a ratchet wrench, it uses a drive/ ratcheting mechanism. The interchangeable design of this handheld tool allows you to tackle many tasks with different sockets.
Understanding the Anatomy of a Socket Wrench
Each part of this tool is essential to its effectiveness and functionality during a job. So, before using it, you should know the different parts of a socket wrench to understand how best to use it.
Handle:
The one end of this component allows you to grasp the tool to twist. The other end of the handle features a square socket head. The handle is the main part of the wrench’s functionality, as it determines how long you can turn the wrench without any interruption.
Ratchet Head:
This is the component where the socket attaches. The low-profile head of a socket wrench allows for clearance during fastening or loosening the fasteners.
Drive Tang
This component comes in different sizes, such as ¼-inch, 3/8-inch, ½-inch. that determine what size socket you can use with the ratchet.
Socket Release Button
It is a small button on the back of the ratchet head that helps to release the socket after use.
Socket
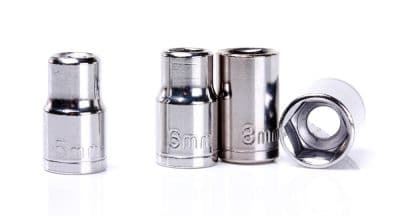
It is a cylinder-shaped part that has two open ends. The hexagonal end fits over a nut or bolt. The other end features a square-shaped hole that fits over the ratchet head on the handle.
Socket is available in metric and standard (SAE) sizes. Some features color-code that helps the user to distinguish between the two types quickly.
How to Use a Socket Wrench– Step-By-Step Guidelines
The following instructions will guide you on how to select the right socket, how to get on and off the socket to the handle, how to change the direction of turning and how to release the socket from the ratchet.
Let’s start!
Step 1: Choose the Correct Size Socket for the Fastener.
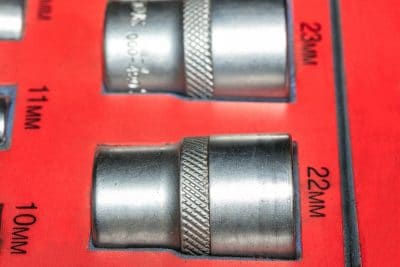
Sockets are available in different sizes and depths. So first, determine the correct size socket that fits your fasteners.
So, how do you find the right socket for your fastener?
The socket is labelled with the size. So, if you know the size of the fastener you want to turn, choosing the corresponding socket size will be straightforward from the socket set.
** Ratchet and socket sets come included with several socket sizes and ratchet
A correct size socket will fit snuggly on the head of the bolt without having to be forced on. Moreover, it won’t feel loose when you twist it with your hand.
The length of the fastener and size of the drive tang plays a vital role while determining the correct socket size for the job. Therefore, you need to use a socket that corresponds to the drive tang of your ratchet.
Sockets fit either 3/4-inch, 1/2-inch, or ¼-inch ratchet drive square. Smaller size sockets fit with smaller drive sizes while larger sockets fit with larger ones.
Low-profile, shallow sockets are perfect for spaces where there is no adequate clearance above the head of the nut.
On the other hand, deep sockets are perfect for the longer, threaded bolt.
12-point and 6- point sockets fit on a variety of fastener heads. Universal sockets are also available that work with multiple fastener types.
What if you’re not sure what socket size you need to turn the fastener?
Test varying socket sizes until you find the right-sized one.
Take the socket that you think is closest to the size you require. Then, slip the socket over the fastener you want to turn to see if it fits. No need to attach it to the ratchet at this stage! This is much easier than trying out different traditional wrenches.
If the socket appears too small or too loose to fit on the nut, try the next size down or up until you find one that fits correctly.
Keep in mind that using the wrong size may damage both the socket and fastener.
Step 2: Attach the Socket to the Ratchet
To properly attach the socket to the head of the ratchet, the drive square of your socket needs to be the same size as the drive square of the ratchet. If not, you can use a socket adapter (also called a drive adapter). This type of adapter allows the socket to fit the ratchet with different drive sizes.
Hold your socket wrench with the drive square knob facing up. Line up the drive socket with the drive square of the ratchet head. Some sockets may feature a drive socket square hole instead of an internal groove or notch within the drive socket. In this case, you should line up this with the ball bearing on the drive square.
Once lined up, press the socket onto the drive square of the ratchet. If it properly snaps into place on the internal notch or drives socket side hole, you’ll hear a click. The socket should be firmly secured to the ratchet. If not, it won’t work or fall off.
Step 3: Select the Turning Direction for Tightening or Loosening
Before starting fastening, it’s essential to check the direction of the ratcheting. Make sure the ratchet is turning in the right direction.
To check the turning direction, hold the socket in your left hand and move the ratchet handle back and forth with your right hand. If you’re looking down on the ratchet head, it should turn the socket-
-clockwise to tighten a fastener
-counter-clockwise to loosen it
If the handle turns the socket in the wrong direction, move the dial knob or lever (situated on the back of the ratchet head) into the other position.
Step 4: Place the Socket On to Bolt or nut
Line the socket head up with the nut or bolt you need to turn. Once aligned correctly, place the socket on the fastener or nut head.
Step 5: Turn the Wrench Handle
Rotate the ratchet handle in the direction you need to turn the nut or bolt. When you reach what is comfortable or there is no room to rotate the handle more, twist the handle back in the opposite direction to reposition to the start point.
Repeat this step as required, swinging the handle back and forth to loosen or tighten the fastener. Don’t remove the wrench from the fastener until you’re finished.
Step 6: Release the Socket When Done.
Once you have completed your fastening job, get the socket off the ratchet handle.
How to Release Socket from the Wrench Head
The way to remove the socket from the wrench handle depends on the design of your ratchet.
Some ratchets that feature spring-loaded ball bearing in the ratchet drive square allow you to pull the socket off from the drive square simply.
For this, you can follow the steps mentioned below:
- Grab the ratchet handle head with one hand and the socket with the other hand. You can use a rag for better grip.
- Apply a little force and pull the socket to release the socket.
- If the socket doesn’t release, apply a lubricant such as WD-40 between the connection point of the socket and ratchet head. Let it sit for a few minutes. Then, attempt to release the socket.

Some socket wrenches feature a quick-release button on the back of the ratchet head. If you depress the button, the socket will fall off the ratchet drive square.
Note: Keep your socket wrench in a dry place when you aren’t using it. It’ll help prevent the socket and wrench from getting stuck together.
Conclusion
Hopefully, these guidelines on how to use a socket wrench were helpful to use. And you have found a socket wrench a lot easier to use efficiently.
Keep practising and get the most of it.
FAQs
What happens if I use a socket that’s too big to the bolt head?
With a socket that’s too big, you risk stripping the bolt head and making it almost impossible to turn. If you attempt to use the wrong sized socket, the inside of the socket may chip. What’s more, it may damage the bolt head, and the corners of the bolt head may wear out. Eventually, it won’t get a grip with the socket making it impossible to unscrew the bolt.
How can I increase the reach of a socket?
You can use your socket wrench with an extension. Socket/ratchet extension bar is helpful to increase the reach of the socket and turn recessed fasteners. You need to attach this bar between the ratchet head and the socket. They are available in various lengths.

How can I use a ratchet at different angles relative to the fastener?
You can use a U-joint adapter to get the job done. It is a jointed attachment that connects the ratchet to the socket to give you the flexibility to turn the nut/ bolt where a standard socket wrench has no clearance to swing the handle back and forth.

How to use a socket wrench to loosen the fastener?
Turn the socket handle counter-clockwise to loosen the nut/bolt.

I’m Ivan D. Mitchell. I’m the Chief Engineer, Manufacturing Engineering Tool and Launch, specialising in automotive equipment design and build which meets World Class Manufacturing methodology. I have 15 years of work experience as a Tooling Specialist on some of the leading automotive manufacturing companies. When I launched this site, I wanted to create a platform where you’ll get everything about tools in one place. I also wanted to share my experience in the tool industry. I’ll do my best to share the information you need to truly make your tool using experience better. I hope you find our guides, reviews, information HELPFUL. If you have any inquiries, I’m always here to help you.