It’s good to know that you just got a socket/ ratchet extender.
But not sure about how to use this adapter?
Fortunately, you are in the right place. In this post, I’m going to talk about how to use a socket wrench with an extension.
Just keep reading our post, and you are going to find out a lot of helpful information.
Let’s get to the details.
What Is a Socket Extension?
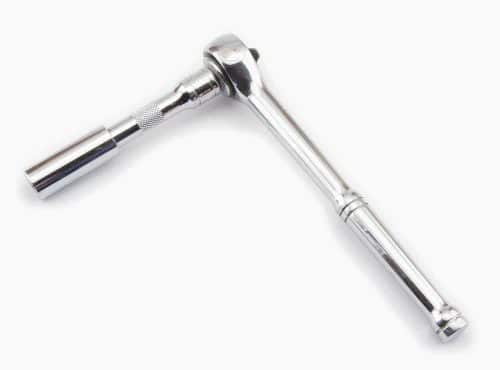
A socket/ ratchet extension (also called “extender arms”) is a fitted bar attached to the ratchet head at one end and a socket on the other end.
This accessory extends the reach of a socket to access fasteners when using a ratcheting socket wrench in confined or awkward spaces. Moreover, the use of a socket extension on a ratchet makes your job a little easier. It’ll also save your back when trying to trim your hedges with a lawnmower or lifting an engine block.
The four-sided attachment point of the extender arm features a detent ball on the male end that holds the socket firmly to prevent the socket from falling off. This spring-loaded ball also lets you remove the socket easily if you need to change the socket sizes.
Socket extenders are available in many different lengths- they can be as shorter as an inch or as long as 3 feet! They are also available in several different styles, such as wobble head extension, knurled extension, etc. Articulated extensions are helpful to ratchet a nut or bolt around a corner.

It’s important to use the correct size ratchet wrench extension for the job. You can’t reach your target fastener if the extender is too short. With a too-long unit, you’ll ruin your chances at effortlessly removing the fastener.
So, how to use a socket wrench with an extension?
The following sections will describe to you the step-by-step guidelines to use a socket with extension.
Let’s find.
Step-1: Attach the extender bar to the ratchet head
Connecting the extender to the ratchet is the same process as attaching a socket to the ratchet head.
First, align the extension bar’s drive socket up with the ratchet head’s drive square. Once lined up, push them together.
If it’s correctly done, you’ll hear a “click” as the detent ball of the drive square of the ratchet head locates into the internal notch of the extender’s drive socket.
Step 2: Connect the socket to the extension bar
Align the drive square of your required socket to the drive square of the extender. Push them to attach. You’ll also heat a “click” sound due to the placement of the ball bearing in the extension bar’s drive square into the internal notch of the socket’s drive socket.
Now, your socket wrench is ready to use with the extension bar.
The following steps are the same that I’ve already described in my post on how to use a socket wrench (steps 3 to 5). However, here again, I’m going to describe these two steps for your convenience.
Step 3: Check the turning direction of your ratchet
Your socket wrench should turn in the right direction for loosening or tightening the nut and bolt.
So, how to check the turning direction?
It’s simple. Hold the socket in your left hand and move the ratchet handle to the back and forth.
For loosening a fastener, the ratchet handle should turn anti-clockwise
For tightening a fastener, the ratchet handle should turn clockwise
There is a dial switch or lever on the back of the ratchet head. If your wrench turns in the wrong direction, move this knob into the other position and check again.
Step 4 – Place the socket with extender onto the fastener head
Align the socket to the head of the nut or bolt you wish to turn. Once aligned up perfectly, place the socket on the nut’s or bolt’s head you need to turn.
Step 5: Turn the ratchet’s handle.
Rotate the handle of your wrench in the direction you need to turn the fastener. Move back the handle to its start point. Don’t worry; when rotating back, the ratchet mechanism will prevent the fastener and socket with extension from turning.
Repeat this step until the nut is removed or the fastener is tightened. Once done, remove the socket and extension bar from the ratchet head.
Removing Socket and Extension Bar from Ratchet Handle
To remove the extension bar and socket from the ratchet handle follow the steps below:
Step 1: Separate the socket with extension bar from the ratchet head
If your wrench includes a release button on the back of the ratchet head, press it. It’ll allow separating the extender from the ratchet handle.
If your socket wrench doesn’t have a release button, hold the extender in one hand and the ratchet in the other hand. Pull both the ratchet and bar apart to separate them.
Step 2: Separate the socket from the extension bar
Hold the bar in one hand and the socket in the other hand. Pull both the components apart.
That’s it!
Let’s wrap things up.
After reading this helpful guide on how to use a socket wrench with an extension bar, you should be able to use this tool with success.
All it requires- perfect size socket and extender for your job, and you are good to go.

I’m Ivan D. Mitchell. I’m the Chief Engineer, Manufacturing Engineering Tool and Launch, specialising in automotive equipment design and build which meets World Class Manufacturing methodology. I have 15 years of work experience as a Tooling Specialist on some of the leading automotive manufacturing companies. When I launched this site, I wanted to create a platform where you’ll get everything about tools in one place. I also wanted to share my experience in the tool industry. I’ll do my best to share the information you need to truly make your tool using experience better. I hope you find our guides, reviews, information HELPFUL. If you have any inquiries, I’m always here to help you.