Hey there! Ever stared at a pile of metal, wondering how to cut through it like butter? Then, you’ve probably come across plasma cutters. These tools are a total game-changer for metalworking.
But here’s the kicker—not all plasma cutters are created equal. When I first got into plasma cutting, I thought it was all about sparks and metal. But I felt lost in terms like “pilot arc” and “non-pilot arc.” I’ve realized there was a whole other layer to this.
Let me tell you a secret: the first time I used a plasma cutter, I nearly burned through my workbench. Why? Because I didn’t understand the difference between a pilot arc and a non-pilot arc plasma cutter.
I’ll save you from my rookie mistakes. Today, we’re diving into pilot arc vs non-pilot arc plasma cutters. What are they? How do they work? Which one is right for you?
Whether you’re slicing through rusty farm gates or crafting sleek metal art, choosing the right tool matters. Whether you’re a DIY artist, or a pro, this guide will help.
Let’s break it down—no jargon, just real talk from my workshop to yours.
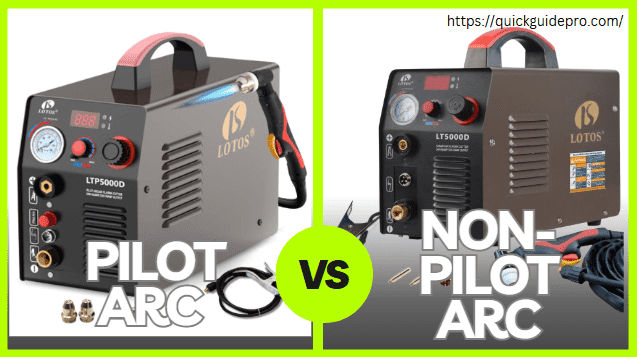
What is a Pilot Arc Plasma Cutter?
A pilot arc plasma cutter starts the cutting process without touching the metal. It uses a high-frequency spark to create an arc before making contact.
Benefits of a Pilot Arc Plasma Cutter:
- No direct contact needed – The torch nozzle lasts longer.
- Cuts through rust, paint, and dirt – No prep work required.
- More precise and controlled cutting – Less mess, less rework.
What Is a Non-Pilot Arc Plasma Cutter?
A non-pilot arc plasma cutter needs direct contact with metal to start cutting. Unlike a pilot arc model, it cannot create an arc without touching the workpiece. Instead, it must touch the metal to make a spark and begin cutting.

How It Works
The torch tip must press against the metal surface. When you pull the trigger, the electrode and nozzle create a short circuit. This makes the plasma arc and starts the cut. Since it needs contact, the metal should be clean and conductive for the best results.
Benefits of Non-Pilot Arc Plasma Cutters
- Simple design – Fewer parts make it easy to use and fix.
- Budget-friendly – Costs less than a pilot arc model.
- Great for clean metal – Works well on smooth metal with little rust or paint.
Limitations of Non-Pilot Arc Plasma Cutters
- Needs a clean surface – Struggles with painted, rusty, or dirty metal.
- Wears out faster – Direct contact makes nozzles and electrodes wear out quicker.
- Not ideal for expanded metal – The arc can stop if the torch loses contact.
Non-pilot arc plasma cutters are simple and cheap. They work best on smooth, solid metal rather than rough or coated materials.
Key Differences: Pilot Arc vs. Non-Pilot Arc Plasma Cutter
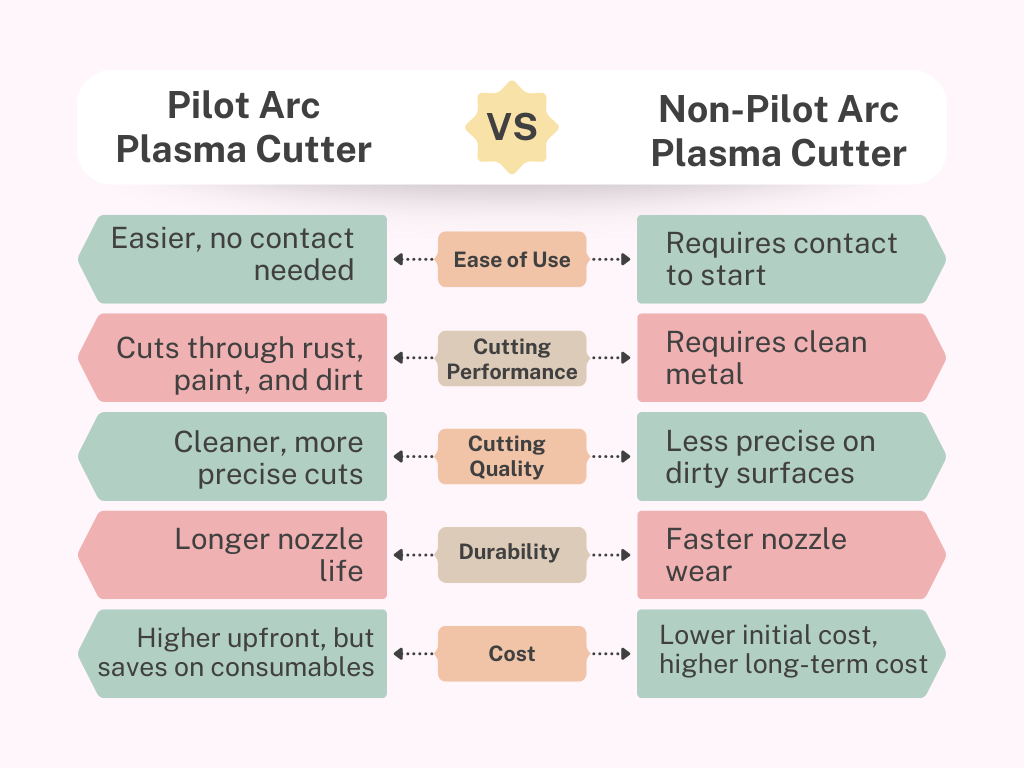
A pilot arc plasma cutter is easier to use. It does not need to touch the metal to start. A non-pilot arc cutter must make contact, which can be less convenient.
Pilot arc cutters work on rust, paint, and dirt. Non-pilot arc cutters need clean metal for the best results. This also affects cut quality. A pilot arc makes cleaner and sharper cuts. A non-pilot arc may struggle on dirty or coated surfaces.
Durability is another key difference. Pilot arc cutters last longer because they reduce wear on the nozzle. Non-pilot arc cutters wear out faster since they must touch the metal.
Cost is also a factor. A pilot arc cutter costs more upfront. But it saves money on consumables over time. A non-pilot arc cutter costs less at first but needs more nozzle replacements, adding to long-term costs.
If you’re a DIYer or hobbyist working with clean metal, a non-pilot arc might be fine. But if you frequently cut rusty or painted materials, a pilot arc cutter will save you so much hassle.
Can You Drag Cut with a Pilot Arc? Yes—Here’s How.
Yes, you can drag cut with a pilot arc plasma cutter! This is one of the best things about using a pilot arc plasma cutter. It doesn’t need a perfect surface to start the arc. Drag cutting is easy because you can just move the torch along the material, making the job faster and simpler.
What is Drag Cutting?
Drag cutting means gently dragging the plasma cutter’s torch along the material. You keep the nozzle just a little above the surface. The arc is started by the pilot arc. This is great because it doesn’t need a perfect spot to begin. You can cut even on rough or uneven surfaces.
Why is Drag Cutting Useful?
- Faster and Easier: Since you don’t need to lift the torch or find the perfect spot to start, drag cutting makes the job quicker.
- Works on Many Surfaces: It’s great for cutting materials that aren’t perfectly flat or clean.
- Lasts Longer: Drag cutting doesn’t wear out the nozzle as quickly. The torch stays close to the surface, which helps keep it in good condition.
Tips for Effective Drag Cutting with a Pilot Arc Plasma Cutter:
- Go Steady: Move the torch at a steady pace. This helps you avoid uneven cuts and overheating the material.
- Pick the Right Nozzle: Use the best nozzle for drag cutting. This will help you cut smoothly without harming the tool.
- Keep a Light Touch: Don’t press too hard on the torch. A soft touch helps keep the nozzle close to the material. This makes sure the arc stays steady.
- Clean the Material: Even though pilot arc cutters can work on dirty materials, cleaning them first will give you a smoother cut.
- Check the Air Pressure: Make sure your air supply is right. Good air pressure keeps the cut clean and helps the arc stay steady.
Drag cutting with a pilot arc plasma cutter is a fast way to cut materials, even if they aren’t perfect. With the right tips, you can get clean cuts without much effort.
How to Use a Pilot Arc Plasma Cutter
Here’s how to use a pilot arc plasma cutter with simple steps to ensure clean cuts and stay safe.
Step-by-Step Guide to Using a Pilot Arc Plasma Cutter
1. Safety First
Before you begin, wear the proper gear to stay safe:
- Welding gloves – These protect your hands from heat and sparks.
- Welding helmet – Protects your eyes from bright light.
- Fire-resistant clothes – Prevents burns from sparks.
- Ear protection – Especially useful in loud areas.
Work in a well-ventilated space, and keep any flammable items away.
2. Setting Up the Machine
Here’s how to set up your machine:
- Pick a good work area – Make sure it’s stable, non-flammable, and well-ventilated.
- Secure the ground cable – Attach it to a metal surface for a solid electrical connection.
- Plug it in – Connect your plasma cutter to the correct power source (110V or 220V).
- Connect the air compressor – Set the pressure between 60-80 PSI.
- Check consumables – Inspect the nozzle and electrode. Replace them if needed.
3. Adjusting Settings
Set the correct amperage:
- Thin metal – Use low amperage.
- Thick metal – Use high amperage. Make sure the air pressure is stable before cutting.
4. Starting the Pilot Arc and Cutting
- Hold the torch – Keep it about 1/8 inch above the metal.
- Press the trigger – This starts the pilot arc.
- Cutting – Move the torch along the line:
- Moving too fast = incomplete cuts.
- Moving too slow = extra slag.
- For longer cuts, use a straightedge for a precise line.
5. Finishing and Maintenance
- Release the trigger – Let the arc stop.
- Cool down – Wait for the metal to cool before touching it.
- Check your cuts – If needed, grind the edges to smooth them out.
- Turn off and unplug the machine.
- Store everything in a dry place.
Best Practices for Clean Cuts
- Keep the torch tip clean – It helps the arc stay stable.
- Move at a steady pace – This avoids jagged edges.
- Start and finish beyond the metal edge – This ensures complete cuts.
- Use a guide or straightedge – It keeps your cuts accurate.
Common Mistakes to Avoid
- Skipping safety gear – Always wear protection.
- Using worn consumables – A bad nozzle or electrode leads to bad cuts.
- Incorrect air pressure – This weakens the arc.
- Unsteady hand movement – Causes messy cuts.
- Not securing the workpiece – Can lead to crooked cuts.
Personal Tip for Best Results
For the cleanest cuts, I slightly tilt the torch forward while cutting. This keeps the arc flowing smoothly and reduces slag. I also recommend doing a test cut on scrap metal to adjust the settings before starting the real cut.
By following these steps, you’ll get clean, precise cuts every time.
Pilot Arc or No? Which One Should You Choose?
Let’s cut through the noise. Choosing between a pilot arc vs non-pilot arc plasma cutter isn’t about “better” or “worse.” It’s about your projects, budget, and the metal you’re slicing.
Let’s break it down.
1. What’s Your Project? Hobbyist or Pro?
- DIYers/Hobbyists: If you’re crafting garden art or fixing farm gates (like my neighbor’s rusty tractor gate last summer), a pilot arc saves headaches. No cleaning rust? Yes, please.
- Pros: Welders or metal shops need speed and versatility. Pilot arcs handle messy jobs (think salvaged steel) without skipping a beat.
- Weekend Warriors: If you’re only cutting clean sheet metal for car repairs, a non-pilot arc works. But remember my workbench incident? Always check your surface.
2. Budget: Upfront Cost vs Long-Term Savings
- Non-Pilot Arc: Cheaper upfront (300−300−600). Great if cash is tight. But nozzles wear faster—replacement costs add up.
- Pilot Arc: Higher initial price (800−800−2,500). Worth it for frequent use. Less consumable swapping saves money (and frustration) over time.
My first plasma cutter was non-pilot. I saved 200…then spent 200…then spent 150 on nozzles in six months. Oops.
3. What’s Your Metal Like? Clean or Crusty?
- Rusty/Painted/Dirty: Pilot arc’s your hero. It laughs at grime. No scrubbing required.
- Pristine Sheet Metal: Non-pilot arc shines here. Just ensure zero paint or rust.
- Expanded Metal? Pilot arc’s “always-on” spark avoids arc outages. Non-pilot? You’ll fight misfires.
Personal Recommendation: When in Doubt, Go Pilot Arc
Unless you’re only slicing clean metal on a tight budget, pilot arc wins. Why? Versatility. I’ve cut everything from barn doors to intricate art with mine. That “pre-arc” magic (what does the pilot arc do? It’s your safety net!) means fewer ruined projects.
Still unsure? Ask yourself:
- How often will I use this?
- Do I hate prepping metal?
- Will I curse if the arc dies mid-cut?
Final Spark: Think of it like buying boots:
- Non-pilot arc = cheap sneakers. Fine for sunny days.
- Pilot arc = rugged hiking boots. Ready for anything.
If you’re serious about metalwork, pilot arc’s worth every penny. But if you’re a casual user? Non-pilot keeps it simple. Either way, slap on those gloves and start cutting!
FAQs: Pilot Arc vs Non-Pilot Arc Plasma Cutters
Got questions? Here are quick answers to help you decide which cutter is right for you!
What does the pilot arc do on a plasma cutter?
The pilot arc works as a “pre-arc.” It lets you cut through metal that has rust, paint, or dirt. You don’t need to clean the surface first. This saves time, especially when working with old or used materials.
Is a pilot arc plasma cutter worth the extra cost?
For most users, spending extra on a pilot arc is worth it. You can cut through rust, dirt, or paint without having to touch the metal. This makes it easier and more versatile, especially if you’re new to plasma cutting.
However, if you only work with clean metal, a non-pilot arc cutter will save you money. You won’t mind the extra steps. It will still get the job done.
How do I maintain a pilot arc plasma cutter?
Maintaining a pilot arc plasma cutter is easy. Check and replace worn parts, like the nozzle and electrode. These parts wear out with use. Keep the torch clean so the arc stays steady. Always check the air pressure. This helps the cutter perform well. After use, clean the machine and make sure the ground cable is secure. Taking care of these things will keep your cutter working great for longer.
For a detailed guide, check out Do You Need Gas for a Plasma Cutter?
Final Thoughts
Choosing the right plasma cutter is all about knowing what you need. Whether you choose a pilot arc or non-pilot arc, the right tool makes a big difference in your work. I hope this guide helped you understand things better and made it easier to pick the right cutter for your projects.
Now, I want to hear from you! Have you used a pilot arc or non-pilot arc plasma cutter? What was your experience? Leave a comment below and let me know your thoughts or ask any questions you have.
Ready to take your plasma cutting skills to the next level? Check out our recommended plasma cutters here to find the perfect one for you!
Happy cutting!

I’m Ivan D. Mitchell. I’m the Chief Engineer, Manufacturing Engineering Tool and Launch, specialising in automotive equipment design and build which meets World Class Manufacturing methodology. I have 15 years of work experience as a Tooling Specialist on some of the leading automotive manufacturing companies. When I launched this site, I wanted to create a platform where you’ll get everything about tools in one place. I also wanted to share my experience in the tool industry. I’ll do my best to share the information you need to truly make your tool using experience better. I hope you find our guides, reviews, information HELPFUL. If you have any inquiries, I’m always here to help you.